Neonate processes information about your visit using cookies to improve site performance, facilitate social media sharing and offer advertising tailored to your interests. By continuing to browse our site, you agree to the use of these cookies. View cookie policy.
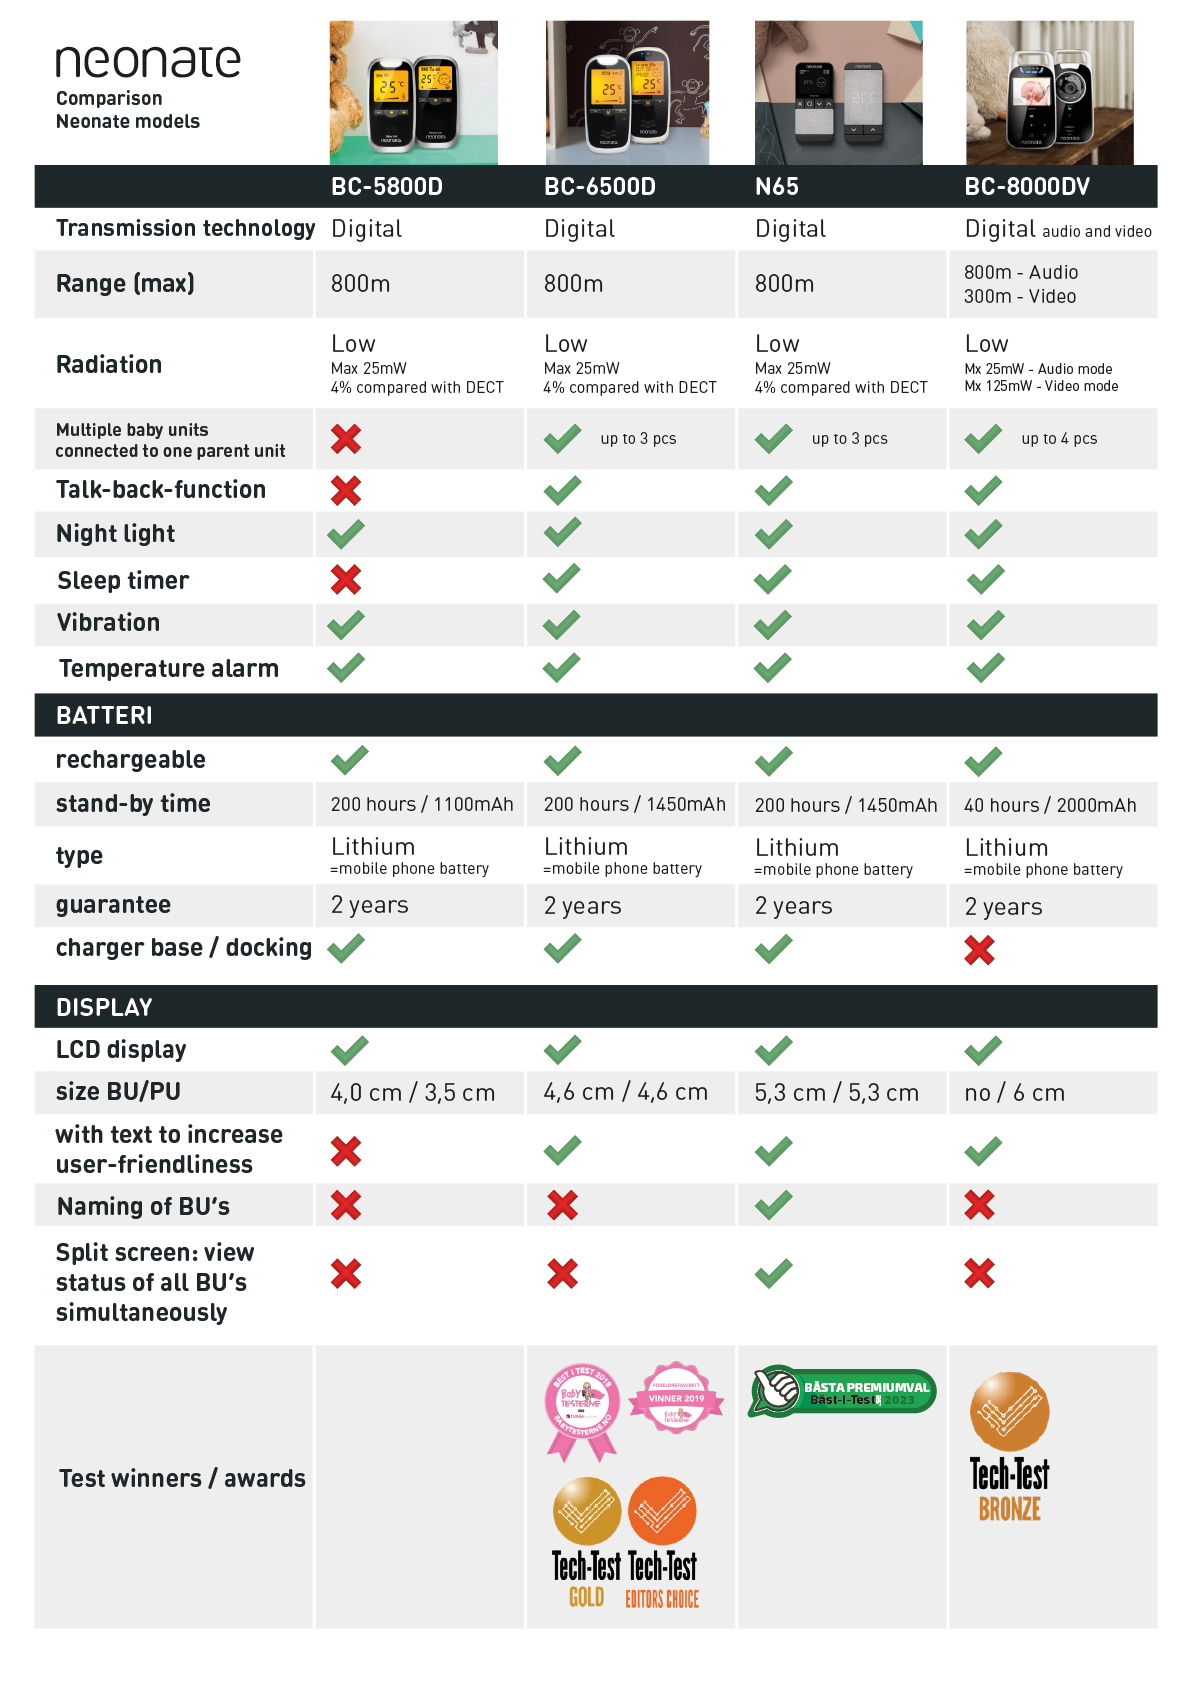
Models comparison sheet
N65
How to pair (connect) N65?
See video here:
https://www.youtube.com/shorts/MKuKcmeClOE
- Enter the Menu
- Choose Pair units
- Choose Pair new baby unit
- Choose Go to pair mode
- Follow the instructions on the screenWhen you hear 2 beeps you can restart your parent unit by
turning it off and then on again. Your baby monitor should be ready for use now.
How to pair (connect) 2 baby units to parent unit N65?
See video here:
https://www.youtube.com/shorts/pv3a29A4CzE
- Enter the Menu
- Choose Pair units
- Choose Pair new baby unit
- Choose Go to pair mode
- Choose 2
- Follow the instructions on the screen When you hear 2 beeps you can restart your parent unit by
turning it off and then on again. Your baby monitor should be ready for use now.
How to avoid OUT-OF-RANGE alarm...

If you have more than one baby unit paired with your parent unit, but only want to use one baby unit, you can set the other baby unit as inactive. An inactive baby unit will be ignored until it is switched on. (It will not trigger the out-of-range alarm).
This is how you set a baby unit as inactive
(This only works if you have more than 1 baby unit connected)
- The baby unit you want to set as inactive must be switched off. When the baby unit is switched on it will automatically be re-activated.
- Enter the Menu
- Choose Baby unit settings
- Choose the baby unit you want to set as inactive
- Choose Active / Inactive
- The status should change to Inactive, and the home screen will change.
Extra baby units are sold separatly.
How to name a baby unit?
With N65 comes the possibility to name the baby units, for example using your child's name. Here is how you do it:
- Enter the menu
- Choose 'Baby unit settings'.
- Choose the baby unit you want to name.
- Choose 'Change name'.
- Use '˄' and '˅' to choose letters and confirm with menu button.
- When done, choose 'Set as new name'.
How to attach mounting kit?
Attach on one side first, then press down on the other side using both hands. You should hear a click when the mounting kit is in place.
How to activate 'Sleep timer'?
See video here: https://youtube.com/shorts/lb6hHR87Khc
- Enter the Menu
- Choose Sleep timer
- Choose ON/OFF
- Choose 'X' repeatedly until you are back at Home Screen.
How to unplug the battery?
See video here:
https://youtube.com/shorts/yaoYS49cpXo
- Use a plastic card and put it into the small opening.
- Pry open while you slide the card around the edges.
- Wiggle the wires and gently pull out socket.
BC-8000DV
How to pair (connect) BC-8000DV?
NOTE! PU and BU are already paired and ready to use out of the box. Nevertheless, we recommend
you to pair the units again to ensure a private connection. If you want to connect another baby unit (or extra baby unit) to the parent unit you need pair the units again.
Prerequisites:
Baby unit must be switched off.
Parent unit must be turned on.
Touch sensitive buttons must be activated (are activated / deactivated by ON /
OFF button)
- Baby unit: Press and hold the (POWER) button for 6 seconds until the «LINK» symbol is flashing rapidly. (The «LINK» symbol is flashing and pairing is possible for 30 seconds)
- Parent unit: Press and hold the (•) button for 2 seconds to enter the menu (Parent unit must be turned on and touch sensitive buttons activated)
- Parent unit: Use the (-/+) buttons to navigate (up/down) and select CONNECTING in menu. Confirm choice by pressing (•) button. If you like, you can now change the number to the baby unit you would like to pair – 1, 2, 3 or 4 – default is 1. Changing baby unit number is not necessary if desired number already is chosen and displayed to the right of BABY in menu.
- Parent unit: Use the (-/+) buttons (up/down) to navigate and select CONNECTED in menu. Confirm choice by pressing (•) button. The menu text will now change from CONNECTED to CONNECTING… and back to CONNECTED again when units are paired and are connected.
Repeat step 1-4 if you wish to pair more baby units to the same parent unit. If more than one baby unit is paired, you must choose different baby unit numbers in step 3 If you wish to disconnect a baby unit which is already paired with parent unit, just repeat step 2-4. When you confirm by pressing (•) button (step 4), the menu text will now change from CONNECTED to DISCONNECTED.
Loses signal «video out of range, audio still in range»?
Have you tried pairing the units once again?
The out of range problem often occurs when there are strong radio signals nearby that interfere with the video communication, it could be a 2.4GHz wifi router close by that interferes with the 2.4GHz video signal of BC-8000DV. To solve this, the units must be placed in a new communication channel, this is done by pairing the units again two to three times.
How to unplug the battery?
See video here:
https://youtube.com/shorts/2HCY-58aBlk
- Slide open the battery cover.
- Wiggle the wires and gently pull out socket.
BC-6500D
How to pair (connect) BC-6500D?
- Parent unit: Press and hold the “BU#”button and set the ON/OFF switch to ON position. Do not release the “BU#”button before PAIR is showing in display.
- Baby unit:Press and hold the “TIMER”button and set the ON/OFF switch to ON position. Do not release the “BU#”button before PAIR is showing in display.
- Baby unit:Use the “+/-“buttons to select the baby unit’s number 1, 2 or 3). Press the “M”button to confirm your choice. The number you have selected will stop flashing.
- Baby unit: Press “M”again to confirm the pairing between PU and BU. Two beep sounds will confirm that the units are paired.
Repeat step 2, 3 and 4 if you wish to pair more baby units to the same parent unit. - Both units:Turn the units off and on by setting the ON/OFF switch to OFF, and then back to ON again. The units are now ready to use.
NOTE: If you wish to pair more than one baby unit to the parent unit, you will have pair all the baby units before you proceed with step 5. It is not possible to add/connect more baby units later without pairing them all again.
How to avoid OUT-OF-RANGE alarm when changing from...
When the parent unit is connected (paired) with more than one baby unit, the parent unit will constantly search for signals from all baby units it is connected with. That means if you pair two baby units to your parent unit but decide to use just one of one them (by turning one BU off) the parent unit will activate the OUT-OF-RANGE alarm indicating that it has lost contact with one baby unit. You can avoid this RANGE alarm in three different ways where we recommend the method described in Section 1.
- When OUT-OF-RANGE is displayed in parent unit (and the baby unit you do not want to use is turned off) you can see a number in the upper right corner indicating which baby unit it has lost contact with.
- Parent unit: Press the «M» button once and the display now shows USE +/- BUTTON (Pressing the «M» button again will return to display OUT-OF-RANGE)
- Parent unit: Press «+» button and the display shows ALARM OFF?
- Parent unit: Press the «M» button and display shows ALARM IS OFF
- Pair only the devices you want to use again. This method is more comprehensive because it requires that you have access to both baby and parent unit and force you to pair each time you change the number of baby units you want to use.
- Enable Zero Radiation Function in the unit that you do not want to use anymore. This will turn off OUT-OF-RANGE alarm permanently and is therefore not recommended because you will not get notice later if the parent unit loses contact with the baby unit. This method requires that the baby unit is turned on at the same time with the parent unit. The method is described further in section on “Turning off / on the Zero-Radiation Function (ZRF).”
How to activate SLEEP TIMER on the units?
- Baby unit: Hold down the "timer" button for 2 sec to activate sleep timer. To reset the clock, press the "timer" button once.
It can also be done through parent unit:
- Hold down the "M" button for 2 sec. The SLEEP TIMER text together with on or off appears on the display. use the +/- buttons to turn the stopwatch function on or off. Press M to confirm your selection.
Why don't I see battery and temperature status?
Could you have activated the Zero Radiation Function?
Activating the Zero Radiation Function makes the baby units stop transmitting signals to the parent unit in standby mode. Radiation = Zero. In standby mode (when the microphone in baby unit is not detecting sound), you will not see temperature or battery status from the baby unit that has activated ZRF. Although, this information will be displayed when the baby is making sound because the information then will be transmitted together with sound signal.
NOTE: When the ZRF is activated, the out-of-range alarm will be deactivated. For this reason, only use the ZRF when you know that the units are within range.
What is the Zero-Radiation-Function (ZRF)?
Zero radiation function means no signals are sent between baby and parent unit when ZRF is activated unless noise is detected, making the stand-by mode entirely radiation free.
How to unplug the battery?
See video here:
https://www.youtube.com/shorts/nd_UKWGi684
- Press down button and pull off battery cover.
- Wiggle the wires and gently pull out socket.
BC-6900D
How to pair (connect) BC-6900D?
- Parent unit: Press and hold the “BU#”button and set the ON/OFF switch to ON position. Do not release the “BU#”button before PAIR is showing in display.
- Baby unit:Press and hold the “TIMER”button and set the ON/OFF switch to ON position. Do not release the “BU#”button before PAIR is showing in display.
- Baby unit:Use the “+/-“buttons to select the baby unit’s number 1, 2 or 3). Press the “M”button to confirm your choice. The number you have selected will stop flashing.
- Baby unit: Press “M”again to confirm the pairing between PU and BU. Two beep sounds will confirm that the units are paired.
Repeat step 2, 3 and 4 if you wish to pair more baby units to the same parent unit. - Both units:Turn the units off and on by setting the ON/OFF switch to OFF, and then back to ON again. The units are now ready to use.
NOTE: If you wish to pair more than one baby unit to the parent unit, you will have pair all the baby units before you proceed with step 5. It is not possible to add/connect more baby units later without pairing them all again.
How to avoid OUT-OF-RANGE alarm when changing from...
When the parent unit is connected (paired) with more than one baby unit, the parent unit will constantly search for signals from all baby units it is connected with. That means if you pair two baby units to your parent unit but decide to use just one of one them (by turning one BU off) the parent unit will activate the OUT-OF-RANGE alarm indicating that it has lost contact with one baby unit. You can avoid this RANGE alarm in three different ways where we recommend the method described in Section 1.
- When OUT-OF-RANGE is displayed in parent unit (and the baby unit you do not want to use is turned off) you can see a number in the upper right corner indicating which baby unit it has lost contact with.
- Parent unit: Press the «M» button once and the display now shows USE +/- BUTTON (Pressing the «M» button again will return to display OUT-OF-RANGE)
- Parent unit: Press «+» button and the display shows ALARM OFF?
- Parent unit: Press the «M» button and display shows ALARM IS OFF
- Pair only the devices you want to use again. This method is more comprehensive because it requires that you have access to both baby and parent unit and force you to pair each time you change the number of baby units you want to use.
- Enable Zero Radiation Function in the unit that you do not want to use anymore. This will turn off OUT-OF-RANGE alarm permanently and is therefore not recommended because you will not get notice later if the parent unit loses contact with the baby unit. This method requires that the baby unit is turned on at the same time with the parent unit. The method is described further in section on “Turning off / on the Zero-Radiation Function (ZRF).”
How to activate SLEEP TIMER on the units?
- Baby unit: Hold down the "timer" button for 2 sec to activate sleep timer. To reset the clock, press the "timer" button once.
It can also be done through parent unit:
- Hold down the "M" button for 2 sec. The SLEEP TIMER text together with on or off appears on the display. use the +/- buttons to turn the stopwatch function on or off. Press M to confirm your selection.
Why don't I see battery and temperature status?
Could you have activated the Zero Radiation Function?
Activating the Zero Radiation Function makes the baby units stop transmitting signals to the parent unit in standby mode. Radiation = Zero. In standby mode (when the microphone in baby unit is not detecting sound), you will not see temperature or battery status from the baby unit that has activated ZRF. Although, this information will be displayed when the baby is making sound because the information then will be transmitted together with sound signal.
NOTE: When the ZRF is activated, the out-of-range alarm will be deactivated. For this reason, only use the ZRF when you know that the units are within range.
What is the Zero-Radiation-Function (ZRF)?
Zero radiation function means no signals are sent between baby and parent unit when ZRF is activated unless noise is detected, making the stand-by mode entirely radiation free.
How to unplug the battery?
See video here:
https://www.youtube.com/shorts/nd_UKWGi684
- Press down button and pull off battery cover.
- Wiggle the wires and gently pull out socket.
BC-5800D
How to pair (connect) BC-5800D?
How to turn on night light/activate VOX on BC-5800D?
How to adjust 'temp alarm' on BC-5800D?
How to pair BC-5800D baby unit to BC-6500D parent unit?
How to unplug the battery?
See video here:
https://www.youtube.com/shorts/nd_UKWGi684
- Press down button and pull off battery cover.
- Wiggle the wires and gently pull out socket.
BC-5700D
How to pair (connect) BC-5700D?
NOTE: PU and BU are already paired and ready to use out of the box. Nevertheless, we recommend you to pair the units again to ensure a private connection.
- Parent unit: Press and hold the (+) button and set the ON/OFF switch to ON position. Do not release the (+) button before (P) is shown in display.
- Baby unit: Press and hold the (+) button and set the ON/OFF switch to ON position. Do not release the (+) button before (P) is shown in display.
- Baby unit: Press (•) to confirm the pairing between PU and BU. Two beeps (sound) will confirm that the units are paired.
- Both units: Turn the units off and on by setting the ON/OFF switch to OFF, and then back to ON again. The units are now ready to use.
BC-4600D
How to pair (connect) BC-4600D?
N65
How to pair (connect) N65?
See video here:
https://www.youtube.com/shorts/MKuKcmeClOE
- Enter the Menu
- Choose Pair units
- Choose Pair new baby unit
- Choose Go to pair mode
- Follow the instructions on the screenWhen you hear 2 beeps you can restart your parent unit by turning it off and then on again. Your baby monitor should be ready for use now.
How to pair (connect) 2 baby units to parent unit N65?
See video here:
https://www.youtube.com/shorts/pv3a29A4CzE
- Enter the Menu
- Choose Pair units
- Choose Pair new baby unit
- Choose Go to pair mode
- Choose 2
- Follow the instructions on the screen When you hear 2 beeps you can restart your parent unit by turning it off and then on again. Your baby monitor should be ready for use now.
How to avoid OUT-OF-RANGE alarm...
If you have more than one baby unit paired with your parent unit, but only want to use one baby unit, you can set the other baby unit as inactive. An inactive baby unit will be ignored until it is switched on. (It will not trigger the out-of-range alarm).
This is how you set a baby unit as inactive
(This only works if you have more than 1 baby unit connected)
- The baby unit you want to set as inactive must be switched off. When the baby unit is switched on it will automatically be re-activated.
- Enter the Menu
- Choose Baby unit settings
- Choose the baby unit you want to set as inactive
- Choose Active / Inactive
- The status should change to Inactive, and the home screen will change.
Extra baby units are sold separatly.
How to name a baby unit?
With N65 comes the possibility to name the baby units, for example using your child's name. Here is how you do it:
- Enter the menu
- Choose 'Baby unit settings'.
- Choose the baby unit you want to name.
- Choose 'Change name'.
- Use '˄' and '˅' to choose letters and confirm with menu button.
- When done, choose 'Set as new name'.
How to attach mounting kit?
Attach on one side first, then press down on the other side using both hands. You should hear a click when the mounting kit is in place.
How to activate 'Sleep timer'?
See video here: https://youtube.com/shorts/lb6hHR87Khc
- Enter the Menu
- Choose Sleep timer
- Choose ON/OFF
- Choose 'X' repeatedly until you are back at Home Screen.
BC-8000DV
How to pair (connect) BC-8000DV?
NOTE! PU and BU are already paired and ready to use out of the box. Nevertheless, we recommend
you to pair the units again to ensure a private connection. If you want to connect another baby unit (or extra baby unit) to the parent unit you need pair the units again.
Prerequisites:
Baby unit must be switched off.
Parent unit must be turned on.
Touch sensitive buttons must be activated (are activated / deactivated by ON /
OFF button)
- Baby unit: Press and hold the (POWER) button for 6 seconds until the «LINK» symbol is flashing rapidly. (The «LINK» symbol is flashing and pairing is possible for 30 seconds)
- Parent unit: Press and hold the (•) button for 2 seconds to enter the menu (Parent unit must be turned on and touch sensitive buttons activated)
- Parent unit: Use the (-/+) buttons to navigate (up/down) and select CONNECTING in menu. Confirm choice by pressing (•) button. If you like, you can now change the number to the baby unit you would like to pair – 1, 2, 3 or 4 – default is 1. Changing baby unit number is not necessary if desired number already is chosen and displayed to the right of BABY in menu.
- Parent unit: Use the (-/+) buttons (up/down) to navigate and select CONNECTED in menu. Confirm choice by pressing (•) button. The menu text will now change from CONNECTED to CONNECTING… and back to CONNECTED again when units are paired and are connected.
Repeat step 1-4 if you wish to pair more baby units to the same parent unit. If more than one baby unit is paired, you must choose different baby unit numbers in step 3 If you wish to disconnect a baby unit which is already paired with parent unit, just repeat step 2-4. When you confirm by pressing (•) button (step 4), the menu text will now change from CONNECTED to DISCONNECTED.
Loses signal «video out of range, audio still in range»?
Have you tried pairing the units once again?
The out of range problem often occurs when there are strong radio signals nearby that interfere with the video communication, it could be a 2.4GHz wifi router close by that interferes with the 2.4GHz video signal of BC-8000DV. To solve this, the units must be placed in a new communication channel, this is done by pairing the units again two to three times.
BC-6500D
How to pair (connect) BC-6500D?
- Parent unit: Press and hold the “BU#”button and set the ON/OFF switch to ON position. Do not release the “BU#”button before PAIR is showing in display.
- Baby unit:Press and hold the “TIMER”button and set the ON/OFF switch to ON position. Do not release the “BU#”button before PAIR is showing in display.
- Baby unit:Use the “+/-“buttons to select the baby unit’s number 1, 2 or 3). Press the “M”button to confirm your choice. The number you have selected will stop flashing.
- Baby unit: Press “M”again to confirm the pairing between PU and BU. Two beep sounds will confirm that the units are paired.
Repeat step 2, 3 and 4 if you wish to pair more baby units to the same parent unit. - Both units:Turn the units off and on by setting the ON/OFF switch to OFF, and then back to ON again. The units are now ready to use.
NOTE: If you wish to pair more than one baby unit to the parent unit, you will have pair all the baby units before you proceed with step 5. It is not possible to add/connect more baby units later without pairing them all again.
How to avoid OUT-OF-RANGE alarm when changing from...
When the parent unit is connected (paired) with more than one baby unit, the parent unit will constantly search for signals from all baby units it is connected with. That means if you pair two baby units to your parent unit but decide to use just one of one them (by turning one BU off) the parent unit will activate the OUT-OF-RANGE alarm indicating that it has lost contact with one baby unit. You can avoid this RANGE alarm in three different ways where we recommend the method described in Section 1.
- When OUT-OF-RANGE is displayed in parent unit (and the baby unit you do not want to use is turned off) you can see a number in the upper right corner indicating which baby unit it has lost contact with.
- Parent unit: Press the «M» button once and the display now shows USE +/- BUTTON (Pressing the «M» button again will return to display OUT-OF-RANGE)
- Parent unit: Press «+» button and the display shows ALARM OFF?
- Parent unit: Press the «M» button and display shows ALARM IS OFF
- Pair only the devices you want to use again. This method is more comprehensive because it requires that you have access to both baby and parent unit and force you to pair each time you change the number of baby units you want to use.
- Enable Zero Radiation Function in the unit that you do not want to use anymore. This will turn off OUT-OF-RANGE alarm permanently and is therefore not recommended because you will not get notice later if the parent unit loses contact with the baby unit. This method requires that the baby unit is turned on at the same time with the parent unit. The method is described further in section on “Turning off / on the Zero-Radiation Function (ZRF).”
How to activate SLEEP TIMER on the units?
- Baby unit: Hold down the "timer" button for 2 sec to activate sleep timer. To reset the clock, press the "timer" button once.
It can also be done through parent unit:
- Hold down the "M" button for 2 sec. The SLEEP TIMER text together with on or off appears on the display. use the +/- buttons to turn the stopwatch function on or off. Press M to confirm your selection.
Why don't I see battery and temperature status?
Could you have activated the Zero Radiation Function?
Activating the Zero Radiation Function makes the baby units stop transmitting signals to the parent unit in standby mode. Radiation = Zero. In standby mode (when the microphone in baby unit is not detecting sound), you will not see temperature or battery status from the baby unit that has activated ZRF. Although, this information will be displayed when the baby is making sound because the information then will be transmitted together with sound signal.
NOTE: When the ZRF is activated, the out-of-range alarm will be deactivated. For this reason, only use the ZRF when you know that the units are within range.
What is the Zero-Radiation-Function (ZRF)?
Zero radiation function means no signals are sent between baby and parent unit when ZRF is activated unless noise is detected, making the stand-by mode entirely radiation free.
BC-6900D
How to pair (connect) BC-6900D?
- Parent unit: Press and hold the “BU#”button and set the ON/OFF switch to ON position. Do not release the “BU#”button before PAIR is showing in display.
- Baby unit:Press and hold the “TIMER”button and set the ON/OFF switch to ON position. Do not release the “BU#”button before PAIR is showing in display.
- Baby unit:Use the “+/-“buttons to select the baby unit’s number 1, 2 or 3). Press the “M”button to confirm your choice. The number you have selected will stop flashing.
- Baby unit: Press “M”again to confirm the pairing between PU and BU. Two beep sounds will confirm that the units are paired.
Repeat step 2, 3 and 4 if you wish to pair more baby units to the same parent unit. - Both units:Turn the units off and on by setting the ON/OFF switch to OFF, and then back to ON again. The units are now ready to use.
NOTE: If you wish to pair more than one baby unit to the parent unit, you will have pair all the baby units before you proceed with step 5. It is not possible to add/connect more baby units later without pairing them all again.
How to avoid OUT-OF-RANGE alarm when changing from...
When the parent unit is connected (paired) with more than one baby unit, the parent unit will constantly search for signals from all baby units it is connected with. That means if you pair two baby units to your parent unit but decide to use just one of one them (by turning one BU off) the parent unit will activate the OUT-OF-RANGE alarm indicating that it has lost contact with one baby unit. You can avoid this RANGE alarm in three different ways where we recommend the method described in Section 1.
- When OUT-OF-RANGE is displayed in parent unit (and the baby unit you do not want to use is turned off) you can see a number in the upper right corner indicating which baby unit it has lost contact with.
- Parent unit: Press the «M» button once and the display now shows USE +/- BUTTON (Pressing the «M» button again will return to display OUT-OF-RANGE)
- Parent unit: Press «+» button and the display shows ALARM OFF?
- Parent unit: Press the «M» button and display shows ALARM IS OFF
- Pair only the devices you want to use again. This method is more comprehensive because it requires that you have access to both baby and parent unit and force you to pair each time you change the number of baby units you want to use.
- Enable Zero Radiation Function in the unit that you do not want to use anymore. This will turn off OUT-OF-RANGE alarm permanently and is therefore not recommended because you will not get notice later if the parent unit loses contact with the baby unit. This method requires that the baby unit is turned on at the same time with the parent unit. The method is described further in section on “Turning off / on the Zero-Radiation Function (ZRF).”
How to activate SLEEP TIMER on the units?
- Baby unit: Hold down the "timer" button for 2 sec to activate sleep timer. To reset the clock, press the "timer" button once.
It can also be done through parent unit:
- Hold down the "M" button for 2 sec. The SLEEP TIMER text together with on or off appears on the display. use the +/- buttons to turn the stopwatch function on or off. Press M to confirm your selection.
Why don't I see battery and temperature status?
Could you have activated the Zero Radiation Function?
Activating the Zero Radiation Function makes the baby units stop transmitting signals to the parent unit in standby mode. Radiation = Zero. In standby mode (when the microphone in baby unit is not detecting sound), you will not see temperature or battery status from the baby unit that has activated ZRF. Although, this information will be displayed when the baby is making sound because the information then will be transmitted together with sound signal.
NOTE: When the ZRF is activated, the out-of-range alarm will be deactivated. For this reason, only use the ZRF when you know that the units are within range.
What is the Zero-Radiation-Function (ZRF)?
Zero radiation function means no signals are sent between baby and parent unit when ZRF is activated unless noise is detected, making the stand-by mode entirely radiation free.
BC-5800D
How to pair (connect) BC-5800D?
How to turn on night light/activate VOX on BC-5800D?
How to adjust 'temp alarm' on BC-5800D?
How to pair BC-5800D baby unit to BC-6500D parent unit?
BC-5700D
How to pair (connect) BC-5700D?
NOTE: PU and BU are already paired and ready to use out of the box. Nevertheless, we recommend you to pair the units again to ensure a private connection.
- Parent unit: Press and hold the (+) button and set the ON/OFF switch to ON position. Do not release the (+) button before (P) is shown in display.
- Baby unit: Press and hold the (+) button and set the ON/OFF switch to ON position. Do not release the (+) button before (P) is shown in display.
- Baby unit: Press (•) to confirm the pairing between PU and BU. Two beeps (sound) will confirm that the units are paired.
- Both units: Turn the units off and on by setting the ON/OFF switch to OFF, and then back to ON again. The units are now ready to use.
BC-4600D
How to pair (connect) BC-4600D?
About Neonate
- The Neonate story
- Collaborations and environment
Products
- Baby monitors
- Accessories
- Spare parts
- Expired models
Support
- Contact us
- Return policy
- Delivery
Follow us
- Newsletter
© 2020 Noricon AS | Cookie Policy
© 2020 Noricon AS
Cookie Policy